The red button on MSI monitors is a small joystick, officially called the Navi Key, that lets you navigate the on screen menu, switch inputs, change picture modes, and reach gaming features without needing a row of separate buttons. On most MSI gaming displays it sits on the back or along the bottom edge, and on many MAG series models it is actually combined with the power button into a single control. If you have been pressing it and are not sure what it does, this breaks down exactly what that red joystick controls and why MSI built it this way.
Three Different “Red” Things People Mean
Before going further, it helps to separate three things that often get mixed up in searches about MSI and the color red. The first is the red joystick on the back of an MSI monitor, which is what this guide covers. The second is a red crosshair overlay that shows up on MSI laptops when certain function key combinations are pressed, a feature tied to MSI Center software rather than a monitor at all. The third is a red cross or bar appearing on screen as a visual glitch, which is usually a hardware or signal issue and has nothing to do with the joystick itself. If your screen shows a stuck red line or crosshair that will not go away, that is a different problem from the one this article answers.
What the Red Button Actually Is
MSI calls this control the Navi Key in its official manuals, short for navigation key. It is a multi directional joystick, not a simple push button, so it moves up, down, left, and right in addition to being pressed straight in to confirm a selection. On a lot of MAG series monitors, MSI labels it as Power Button and Navi Key in the manual, meaning the same red element both turns the display on and controls the menu once it is running. That dual purpose design is part of why the button can feel confusing the first time you use it, since a short press, a long press, and a push in a direction can each trigger something different depending on the model.
Where to Find It on Your Monitor
Location varies by model, but there are some consistent patterns across the lineup. On most Optix and MAG monitors, the Navi Key sits on the back panel, usually toward the bottom right when you are facing the screen from behind. Some models instead place it along the bottom edge of the bezel, tucked underneath where it is easy to reach with a finger without looking. A handful of higher end models, including some in the MEG series, swap the standard joystick for a dial style control that works differently, so if your monitor does not have a simple red nub on the back, check whether it uses MSI’s alternate control layout instead.
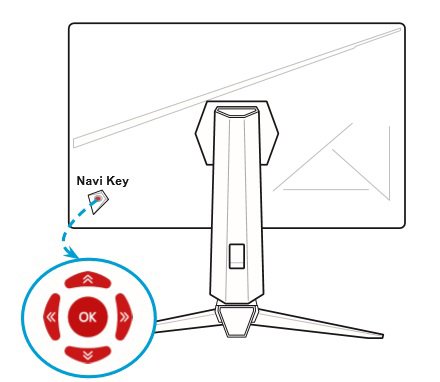
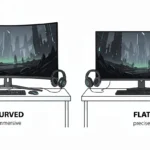
Curved monitors in particular tend to tuck the Navi Key further toward the right edge, since the curve of the panel changes where a comfortable reach point actually is. On flatter models, it usually sits closer to the center of the bottom edge instead. If you cannot locate it by feel, running a hand along the bottom and back edges near the right side of the panel almost always finds it faster than searching visually, since the button itself rarely stands out against the black plastic housing.
How the Navi Key Works
Basic Navigation
Once the on screen menu is open, moving the Navi Key up, down, left, or right lets you move between menu items and adjust values, while pressing it straight in selects or confirms whatever option is highlighted. Pushing it in a single direction without opening the menu first often triggers a quick action instead, like jumping straight to input selection or picture mode, which is where the shortcut behavior comes in.
Hot Key Shortcuts
MSI’s manuals refer to these shortcuts as Hot Key functions. Instead of digging through the full menu every time, a quick push of the Navi Key in a specific direction can jump straight to a preset function, such as switching picture mode or adjusting brightness, without opening the complete on screen display first. The exact shortcut assigned to each direction can differ from model to model, so it is worth spending a minute testing each direction on a new monitor to learn what it does on yours.
Functions You Can Access Through the Red Button
Picture and Color Settings
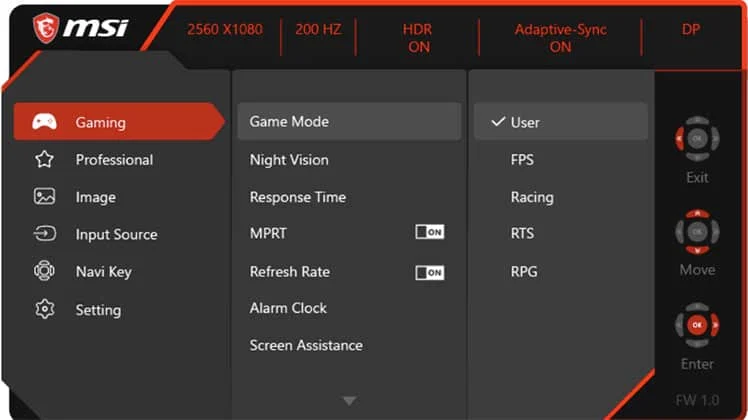
The most common use of the Navi Key is adjusting how the screen looks. You can switch between presets like game, movie, or standard mode, then fine tune brightness, contrast, and color temperature from inside the same menu. These settings are useful when lighting changes in the room, or when a specific game looks too dark or too washed out on default settings.
Gaming Tools
Inside the gaming section of the menu, MSI monitors typically offer a crosshair overlay for games that lack one, an on screen FPS counter, and anti motion blur settings that can reduce the smearing some panels show during fast movement. Many models also let you toggle adaptive sync features like FreeSync compatibility directly from this menu rather than relying only on graphics card software.
Some gaming monitors also include a timer and a counter overlay tucked into this same section, useful for practicing reaction time or just keeping track of a session length without alt tabbing out of a game. These tend to be buried a layer or two deeper in the menu than the more commonly used crosshair and FPS counter options, so it is worth spending a few minutes the first time clicking through every submenu just to see what your specific model actually includes, since MSI does not always list every feature on the box.
Input Source Selection
Pushing the Navi Key toward the input shortcut, or navigating to it through the main menu, lets you switch between connected devices such as a PC, a console, or a laptop without unplugging anything. This is especially handy if you regularly connect a gaming monitor to a PC alongside a second device sharing the same screen.
System Options
Deeper in the menu, the same button handles system level tasks, including resetting the monitor back to factory settings if something has been changed by accident, and on some models, checking for firmware updates that can add features or fix bugs after release.
What Is HDCR on MSI Monitors?
HDCR stands for High Dynamic Contrast Range, and it is a feature available on several MSI monitors through the Navi Key or MSI’s GamingOSD software. Rather than being a content standard like HDR, HDCR works off an ambient light sensor built into the monitor, which reads how bright or dark the room is and adjusts contrast on the fly to keep detail visible in shadows even when the room lighting changes.
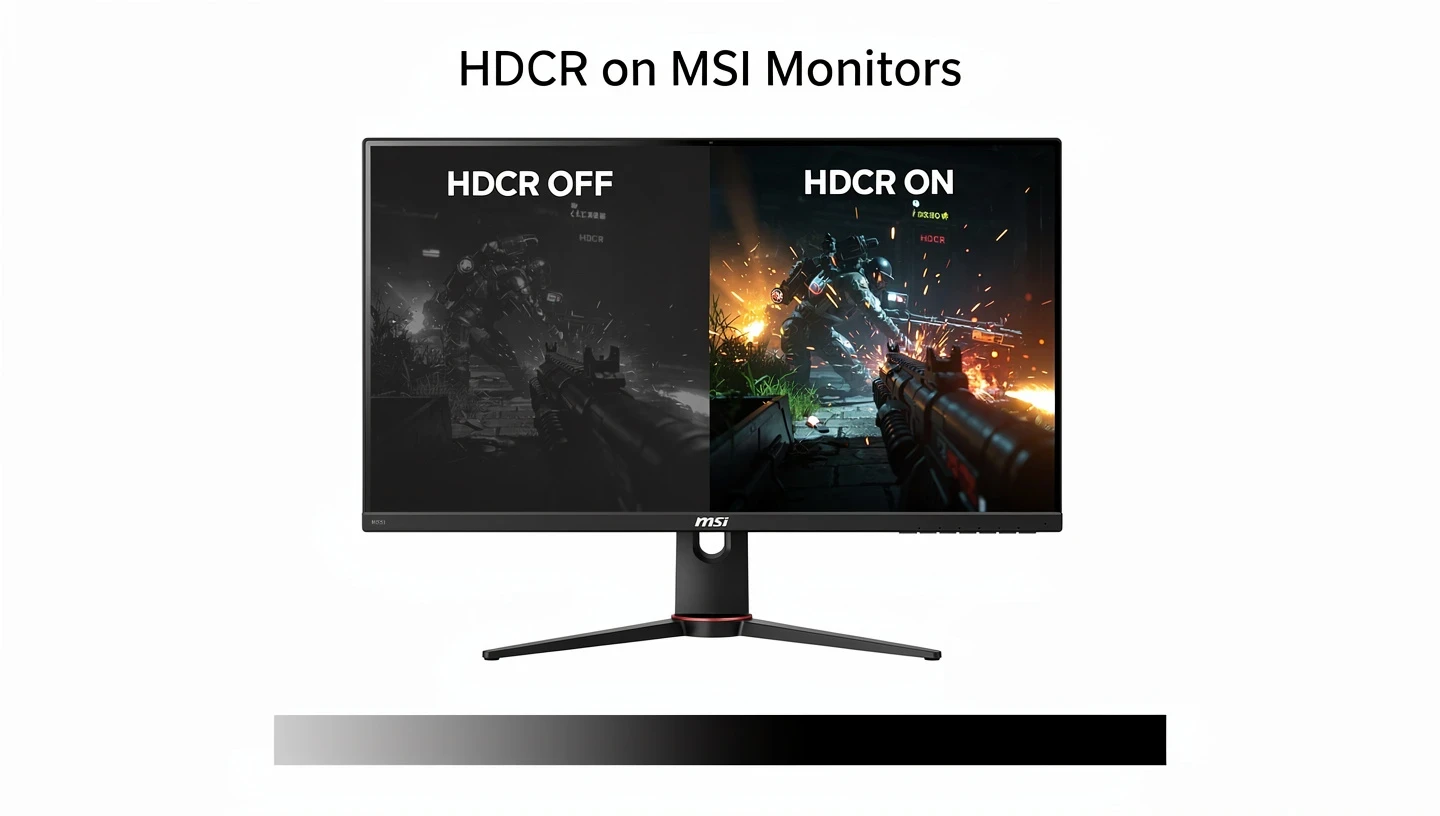
It is worth not confusing this with HDR, which depends on the content itself being mastered for a wider range of brightness and color rather than reacting to your room, using VESA’s published DisplayHDR criteria as a reference point, and is more of a visibility aid for everyday use than a true picture quality upgrade on its own.
Refresh Rate and Alarm Clock Overlay
A feature that rarely gets mentioned outside MSI’s own manuals is the ability to choose where on screen an overlay appears. This sits in a different part of the menu than the picture and color settings covered above, usually grouped with other gaming extras rather than filed under Picture, so it is easy to miss if you are only skimming the main categories.
Through the Navi Key, some monitors let you set a corner for a live refresh rate counter, so you can confirm the display is actually running at the Hz you expect without opening a separate app. A similar option exists for an on screen clock on certain models, letting you pick which corner it sits in so it does not get in the way during a game.
Controlling the Monitor From Your PC Instead
If pressing a tiny joystick on the back of the screen is not your idea of a good time, MSI offers a software alternative called MSI Gaming Intelligence, also referred to as GamingOSD in some of its documentation, which MSI covers in more detail on its own blog. Once the monitor is connected to a PC over USB alongside the usual HDMI or DisplayPort cable, this software mirrors most of what the Navi Key can do, including picture mode, color settings, and gaming features, directly from a window on your desktop. It also handles RGB lighting on supported models through MSI’s Mystic Light system, and can manage firmware updates without needing to dig through the on screen menu at all.
Why MSI Uses One Button Instead of Several
Older monitors, including early MSI models, often relied on a row of small, flat buttons along the bottom edge that were easy to mix up, especially in a dark room where you could not see the labels. A single joystick solves that problem by replacing several separate controls with one element you can find by feel and operate without looking. It also makes fast adjustments easier mid game, since nudging the stick in one direction is quicker than hunting for the right button among four or five identical looking options.
There is a tradeoff though. A row of dedicated buttons makes certain single actions, like muting volume or jumping straight to input selection, a one touch job, while a joystick usually needs a short sequence of moves to reach the same setting. For someone who rarely touches the menu after initial setup, that difference barely matters. For someone who swaps inputs several times a day between a PC, a console, and a laptop, the extra steps can start to feel slower than the old button row it replaced, which is part of why MSI also built a software option for people who would rather skip the joystick altogether. A few higher end models also surface G-Sync compatibility status right in this same system area, confirming whether the panel has been validated for Nvidia hardware without digging through the gaming section separately.
Setting Up a New MSI Monitor for the First Time
The first time you power on a new MSI display, the Navi Key is also how you walk through initial setup rather than anything happening automatically. After connecting a cable and powering the monitor on, a short press typically opens the main menu, where the input source should already be detected if everything is plugged in correctly. From there, picking a picture preset that matches what you plan to do, whether that is general use, movies, or a gaming focused mode, is usually the first setting worth checking before anything else.
Spending a few minutes going through each submenu during this first setup, rather than leaving everything on factory defaults, is also the easiest time to learn the button’s layout, since you are not under pressure to fix something mid game. If you are putting together a new desk and want the full process from unboxing to final adjustments, a broader guide on how to set up a gaming monitor covers the steps around the Navi Key as well, including cable choice and stand assembly.
Troubleshooting the Red Button
The Joystick Feels Stiff or Doesn’t Click
A joystick that feels mushy or does not register a clean click is usually a sign of wear or a manufacturing inconsistency rather than something you did wrong. Try pressing it from a slightly different angle before assuming it is broken, since some units are more sensitive to how straight the press lands.
Pressing It Does Nothing
If nothing happens at all, confirm the monitor actually has power and is not in standby, since the Navi Key on combined models may be unresponsive if the display itself is off rather than just asleep. It is also worth checking whether the on screen menu has been locked, which stops the joystick from doing anything until it is unlocked again.
Monitor Won’t Turn On Even After Pressing It
On models where the Navi Key doubles as the power button, a long press is usually required rather than a quick tap, often somewhere around two to three seconds. If nothing happens after holding it, check the power cable and outlet before assuming the button itself has failed.
OSD Menu Is Locked
MSI monitors can lock the on screen menu to prevent accidental changes, usually triggered by holding the Navi Key or pressing it alongside another control for several seconds. The exact combination to unlock it varies by model, so checking the manual for your specific monitor is the most reliable way to confirm the sequence rather than guessing.
Settings Keep Resetting on Their Own
If picture settings seem to revert after unplugging the monitor or switching inputs, check whether a Dynamic or Auto preset is active, since some of these modes reapply their own values every time the signal changes. Switching to a fixed preset like Standard before making manual adjustments usually stops the settings from drifting back on their own.
Wrong Function Triggers When You Push a Direction
Because Hot Key shortcuts are assigned per direction and can differ between models, pushing the Navi Key the way you expect sometimes opens a different menu than planned. Rather than memorizing a generic layout, it is faster to push each direction once with the menu closed and note what each one does on your specific unit, since that mapping rarely changes once you have logged it.
Control Type by MSI Series, at a Glance
Since the exact control scheme changes depending on which part of the lineup a monitor comes from, a quick side by side view makes it easier to know what to expect before you even take the monitor out of the box.
| Series | Primary Control | Combined With Power | Notes |
|---|---|---|---|
| Optix | Navi Key joystick | Often yes | Most common consumer gaming line |
| MAG | Navi Key joystick | Often yes | Some models add a separate Macro Key |
| MEG | Navi Key or HMI dial | Varies | Higher end models may use a rotating dial instead |
| PRO and Modern | Varies by model | Less consistent | Office focused line, not always joystick based |
Macro Key and Other Extra Controls on Some Models
A few MSI monitors include a separate Macro Key next to the Navi Key, giving you a dedicated shortcut button in addition to the joystick rather than relying on it for everything. At the higher end of the lineup, some models move away from the joystick design entirely. MSI’s MEG381QCR, for example, pairs its display with a small secondary screen and a rotating dial MSI calls a Human Machine Interface, used for adjusting settings and even monitoring connected system stats rather than a traditional red joystick.
Checking the Real HDR Level Behind the Marketing Name
Because HDCR and HDR both show up in the same menu and sound similar, it helps to check the actual HDR certification level a monitor carries rather than assuming HDCR covers the same ground. A monitor listed only at the entry tier will look noticeably different in bright highlights than one certified higher up, regardless of whether HDCR is switched on, so the two settings are worth treating as separate decisions rather than one combined toggle.
Does Every MSI Monitor Have This Button?
Most monitors in MSI’s gaming focused Optix and MAG lines use the red Navi Key as their primary control, so if you own a gaming display from either series, you almost certainly have one. Monitors outside the gaming lineup, including some models aimed at office or creative work, do not always follow the same layout, and control schemes there can vary more than they do across the gaming series. If you are unsure which category your monitor falls into, checking the model name against MSI’s support site is the quickest way to confirm what kind of controls it ships with.
Buyers coming from a different brand sometimes expect the exact same layout across every MSI product simply because the joystick looks similar from photos online, but panel size and resolution do not always predict which control scheme a specific model uses. A 27 inch QHD gaming monitor and a 34 inch ultrawide from the same product year can still ship with different button arrangements depending on when each one was designed, so matching the exact model number against the manual remains more reliable than going off general assumptions about the lineup.
Frequently Asked Questions
What is the red button on MSI monitors?
It is a joystick called the Navi Key that controls the on screen menu, letting you adjust picture settings, switch inputs, and access gaming features without a row of separate buttons.
What does Navi Key mean?
Navi Key is MSI’s official name for the red multi directional joystick found on most of its gaming monitors, used to navigate and confirm selections in the on screen display.
Why is my MSI monitor red button not working?
Check that the monitor has power and is not in standby, confirm the on screen menu is not locked, and try pressing from a slightly different angle, since a stiff or unresponsive feel can sometimes just be how that particular unit was assembled.
What is HDCR and should I turn it on?
HDCR stands for High Dynamic Contrast Range and uses an ambient light sensor to adjust contrast based on room lighting. It is worth trying in a bright room where shadow detail tends to wash out, though it is a visibility feature rather than a true picture quality upgrade like HDR.
How do I factory reset my MSI monitor using the red button?
Open the on screen menu with the Navi Key, navigate to the system settings section, and select the reset or factory default option, which clears any picture or gaming adjustments you have made.
Is the red crosshair on my screen the same as the red button?
No, a red crosshair overlay is usually a feature tied to MSI Center software on laptops, triggered by a function key combination, while a crosshair or bar that will not disappear at all is more likely a display issue unrelated to the Navi Key.
Can I control my MSI monitor without using the red button?
Yes, MSI Gaming Intelligence software lets you adjust picture modes, color settings, and gaming features from your PC once the monitor is connected over USB, covering most of what the Navi Key does without touching the joystick at all.
Final Thoughts
The red button on MSI monitors is not just a design choice, it is the main way you interact with the display once it is out of the box, from picking the right input to fine tuning picture quality for whatever you are doing. Once you know it is called the Navi Key and understand the basic pattern of short presses, long presses, and directional nudges, the menu stops feeling mysterious and becomes one of the faster ways to adjust a gaming monitor without reaching for separate software every time.