Connecting a gaming monitor to a PC looks confusing the first time you try it, but once you know which cable goes where, the whole thing takes less than five minutes. You plug in a cable, turn on both devices, and in most cases the picture just shows up on its own. The tricky part is picking the right cable and the right port, especially if your PC has more than one type of video output on the back. This guide walks you through everything you need, from checking your cables to fixing a black screen if the picture does not appear right away.
Whether you just built your own PC or bought a new monitor to pair with an older setup, the steps below apply to almost any combination of hardware. Grab your cables and your monitor’s power adapter before you start, and you will be gaming on the new screen within a few minutes.
Most people run into trouble not because the process is hard, but because they grab the wrong cable or plug it into the wrong port without realizing it. A gaming PC often has several video outputs at once, some on the graphics card and some built into the motherboard, and mixing them up is the single biggest reason people end up staring at a black screen after doing everything else correctly. Once you understand that one detail, the rest of the setup becomes almost automatic.
What You Will Need
Before you touch a single cable, it helps to know exactly what you are working with. Most gaming monitors ship with at least one video cable in the box, but older monitors or hand me down displays often do not come with anything, so you may need to buy a cable separately.
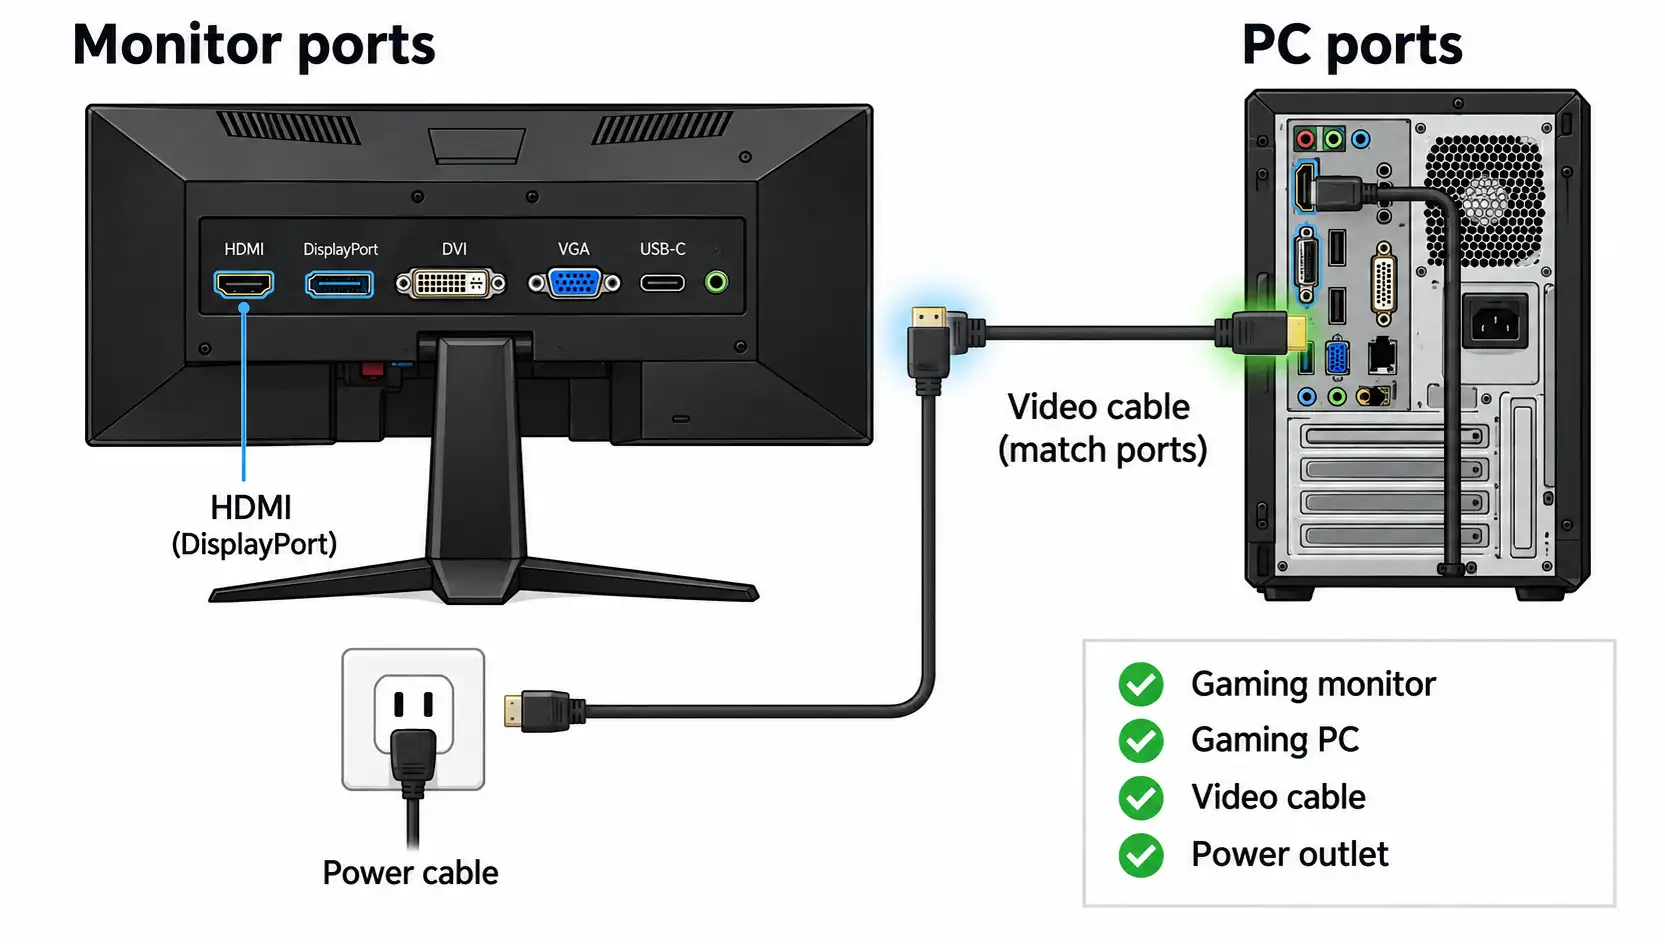
Take a minute to look at the back of both your monitor and your PC and note down which ports are actually available before you go shopping for a cable, since buying the wrong connector is a common and easily avoidable mistake.
- A gaming monitor with at least one video input (HDMI, DisplayPort, DVI, VGA or USB-C)
- A gaming PC with a dedicated graphics card or onboard graphics
- A video cable that matches a port on both the monitor and the PC
- A power cable for the monitor
- A free power outlet close to your desk
If you have not picked out a monitor yet, it is worth reading our guide on how to choose a gaming monitor first, since the panel type and resolution you pick will decide which cable gives you the best result. Once you have the monitor and the cable in hand, the rest of the setup is mostly plugging things into the right spot, and none of it requires any tools or technical knowledge beyond what this guide already covers.
Types of Video Ports Explained
Almost every gaming monitor and gaming PC made in the last several years will have some combination of HDMI, DisplayPort, USB-C, or on older machines, DVI and VGA. Knowing what each one does helps you pick the cable that actually gets the most out of your screen, instead of just grabbing whatever is lying around. The port you choose affects more than just whether the picture shows up, it can also cap how sharp the image looks and how smooth motion feels once you start actually playing.

HDMI
HDMI is the most common port you will find on monitors, TVs, laptops and gaming PCs. It carries both video and audio through a single cable, which makes it an easy default choice. Older HDMI versions cap out at lower refresh rates on higher resolutions, so if you are chasing 4K resolution at a high frame rate, check which HDMI version your cable and your ports actually support before you assume it will work. HDMI 2.0 tops out around 4K at 60Hz, while HDMI 2.1 can push 4K past 120Hz, so it is worth checking the version printed on the box or the cable itself if your monitor supports faster refresh rates.
DisplayPort
DisplayPort is the port most serious gamers reach for first. It generally offers more bandwidth than HDMI, which means it can push higher resolutions at a faster refresh rate without dropping frames. DisplayPort 1.4 comfortably handles 1440p at 240Hz or 4K at high refresh rates with the right cable, which is why most 360Hz monitors ask for DisplayPort specifically rather than HDMI. If your monitor and your graphics card both have DisplayPort, that is usually your best option for competitive or fast paced games.
USB-C
USB-C is becoming more common on newer monitors and laptops. A single USB-C cable can carry video, data and sometimes even power at the same time, which is handy if you want to cut down on cable clutter. Not every USB-C port supports video output though, so double check that yours does before you rely on it.
DVI and VGA
DVI and VGA are older standards that you will mostly see on budget monitors or PCs that have not been upgraded in a while. VGA is an analog connection and tends to produce a softer image compared to digital options, while DVI still gives a sharp picture but lacks audio support entirely. Neither is ideal for a modern gaming setup, but they still work fine if that is all your hardware has.
One thing that trips people up is assuming every cable of the same type performs the same way. A cheap HDMI cable bought years ago may not support the bandwidth needed for a high refresh rate at 4K, even though it physically fits the port. The same goes for DisplayPort cables, where certification versions matter more than most people expect. If your picture looks fine but you cannot get the refresh rate you paid for, a worn out or outdated cable is often the actual problem rather than the monitor or graphics card.
| Port | Video Quality | Audio Support | Best For |
|---|---|---|---|
| HDMI | Very good | Yes | General use, consoles, most monitors |
| DisplayPort | Excellent | Yes | High refresh rate gaming |
| USB-C | Very good | Yes | Laptops, modern monitors |
| DVI | Good | No | Older PCs and monitors |
| VGA | Basic | No | Legacy hardware only |
How to Connect a Gaming Monitor to a PC Step by Step
Once you know which cable you are using, the actual process of connecting your gaming monitor to a PC comes down to five short steps. Follow them in order and you should have a picture on screen the first time.

Step 1: Pick the Right Cable
Match the connector shape on your monitor to a port on the back of your PC. If both devices have DisplayPort, use that. If one only has HDMI, use HDMI instead. Do not force a cable into a port that does not match, the shapes are different on purpose so you cannot plug the wrong one in by accident.
Step 2: Find the Graphics Card Port, Not the Motherboard Port
This is the single most common mistake people make when they connect a gaming monitor to a PC for the first time. If your PC has a dedicated graphics card, the ports you want are on the card itself, usually a horizontal slot near the bottom of the case. There are often extra video ports higher up on the motherboard too, but plugging into those means your PC will use the weaker onboard graphics instead of your graphics card, which hurts performance badly. Only use the motherboard ports if you do not have a dedicated graphics card installed. It is an easy mistake to make since both sets of ports often sit close together on the back of the case, and a monitor plugged into the wrong one will usually still show a picture, just a much choppier one, which makes the mistake harder to notice at first glance. If your games feel slower than they should even on decent hardware, this is always worth double checking before you blame anything else.
Step 3: Plug the Cable Into the Monitor
Turn your monitor around and match the cable to one of the video inputs on the back or underside. It should slide in without much force. Once it is seated, connect the other end to the graphics card port you identified in step two.
Step 4: Connect the Power Cable
Plug the monitor’s power cable into the back of the display, then into a wall outlet or power strip. Some monitors use an external power brick instead of a built in power supply, so make sure that is plugged in properly as well.
Step 5: Turn Everything On
Switch on your monitor first, then your PC. Most monitors will automatically detect the correct input and show the picture within a few seconds. If it does not switch automatically, use the input or source button on the monitor to select the correct port manually. Once the picture appears, you can move on to fine tuning things like resolution and refresh rate, which we cover in our full guide on how to set up a gaming monitor.
Setting Up Your Monitor After Connecting It
Getting a picture on screen is only half the job. A few settings changes make a real difference to how your games actually look and feel once everything is plugged in.
Choosing How Windows Uses Your Monitor
Once your PC detects the new monitor, you get to decide how it behaves. Press Windows key + P on a Windows PC (or Command + F1 on a Mac) to bring up a quick menu with four options: PC screen only, Duplicate, Extend, or Second screen only. Extend is what most gamers want, since it lets the monitor act as its own screen rather than mirroring another display. If you are running more than one monitor, you can also open display settings, drag the on screen icons to match how the monitors physically sit on your desk, and mark one of them as your main display so your taskbar and new windows open where you expect them to.
Resolution and Refresh Rate
Open your display settings and set the resolution to your monitor’s native value, this is usually 1920×1080, 2560×1440 or 3840×2160 depending on the panel. Resolution is really just a count of pixels, the tiny dots that make up the image, so a higher number means a sharper picture but also more work for your graphics card to render every frame. Then set the refresh rate as high as your monitor and cable both support. A higher refresh rate combined with a fast response time is what makes fast motion in shooters and racing games look smooth instead of blurry. Windows will usually pick a sensible default on its own, but it does not always select the maximum refresh rate your monitor supports, so it is worth opening the advanced display settings just to confirm you are actually running at the number printed on the box rather than a lower fallback value.
Turning On G-Sync
If your monitor and graphics card support it, enabling G-Sync matches your display’s refresh rate to whatever frame rate your GPU is actually putting out. This removes screen tearing and makes gameplay feel noticeably smoother, especially in fast paced titles where the frame rate jumps around a lot.
If you have an AMD graphics card instead, the equivalent feature is FreeSync, and it works the same way. You will usually find the toggle inside your graphics card’s control panel rather than in Windows settings directly, so check there if you cannot find the option right away.
HDR and Color Settings
If your monitor supports HDR, turn it on both in your Windows display settings and inside the game itself, since it usually needs to be enabled in both places to actually work. Along with HDR, bumping up the color depth in your graphics card settings can make a noticeable difference on higher end panels, though the improvement is more subtle on budget monitors.
Connecting Multiple Monitors to a Gaming PC
Adding a second or third monitor to your gaming PC is simple as long as your graphics card has enough free ports. Connect each monitor the same way you connected the first one, matching cables to available ports on the graphics card. Windows will detect the new display automatically and let you choose whether to extend your desktop across all of them or duplicate the same picture on each screen.
- Try to use monitors of the same or similar model when running multiple displays side by side, it makes matching resolution and refresh rate much easier
- Mixing cable types across monitors is fine, one HDMI and one DisplayPort will work together without issues
- Some monitors support daisy chaining through DisplayPort, letting you connect one monitor to another instead of running separate cables all the way back to the PC
If you plan on gaming across multiple screens rather than just using extras for work or browsing, pay attention to how many ports your graphics card actually has free. Budget cards sometimes only include one DisplayPort and one HDMI output, which limits how many high refresh rate monitors you can run at their full potential at the same time. Running one monitor through the graphics card and another through the motherboard will work for basic tasks, but the motherboard connected screen will not benefit from your graphics card at all.
Troubleshooting: No Signal or Black Screen
If you have followed every step above and still see nothing on screen, do not worry, this almost always comes down to one of a handful of simple issues.
- Double check the cable is fully seated on both ends, a loose connection is the most common cause of a black screen
- Confirm you plugged into the graphics card and not the motherboard, especially if you have a dedicated GPU installed
- Use the monitor’s input or source button to manually select the correct port
- Try a different cable if you have one available, cables do fail over time
- Restart both the monitor and the PC after reconnecting everything
- Check that the monitor is actually receiving power, a blinking or amber standby light usually means it is not getting a signal rather than a power problem
- If you recently updated your graphics drivers, a quick restart often resolves display detection issues that show up right after the update
If none of that works, it is worth checking your display settings directly inside Windows, since a monitor can sometimes be detected but set to the wrong output. Microsoft’s own support documentation on managing displays in Windows is a good place to confirm your PC is actually seeing the monitor before you assume the hardware itself is faulty.
Common Mistakes to Avoid When Connecting a Gaming Monitor
A handful of small errors account for most of the problems people run into, and knowing about them ahead of time saves a lot of back and forth trying to figure out what went wrong.
- Plugging into the motherboard instead of the graphics card, which quietly limits performance without producing an obvious error
- Using an old or damaged cable that physically fits but cannot handle the bandwidth needed for a high refresh rate
- Forgetting to switch the monitor’s input source after connecting a new cable to a different port
- Assuming HDR or VRR is on by default when it almost always needs to be turned on manually in both Windows and the game itself
- Running two monitors at different refresh rates and being surprised when one feels less smooth than the other
None of these are difficult to fix once you know to look for them, and checking through this list takes a lot less time than restarting your entire setup from scratch. Most of the time the fix takes under a minute once you actually spot the mistake.
Final Thoughts
Connecting a gaming monitor to a PC really comes down to matching the right cable to the right port and plugging it into your graphics card instead of your motherboard. Once the picture is on screen, a few minutes spent on resolution, refresh rate and VRR settings will make a bigger difference to how your games actually feel than most people expect. If your desk setup allows for it, mounting the monitor on an arm or a VESA compatible stand also frees up space and makes it easier to get the height and angle right, which is a small extra step worth considering once the cabling itself is sorted.
Get the connection right the first time and you likely will not have to think about it again until you upgrade your hardware. Keep the cable, the port and the settings all matched to what your monitor can actually do, and the setup process stays simple no matter how many times you rearrange your desk or add a second screen down the line.
Frequently Asked Questions
What is better for gaming, HDMI or DisplayPort?
DisplayPort generally offers more bandwidth, which means higher resolutions at faster refresh rates without dropping frames. HDMI is still a solid choice and is more universal across devices, but if your setup supports both, DisplayPort is usually the better pick for competitive gaming.
Why is my monitor not detected by my PC?
This is almost always a cable or port issue. Check that the cable is fully plugged in on both ends, confirm you are using a graphics card port rather than a motherboard port, and try selecting the correct input manually using the buttons on the monitor itself.
Can I connect a gaming monitor wirelessly?
Some newer monitors support wireless display technology such as Miracast, which lets you send a picture from your PC without a cable. Performance and latency are usually worse than a wired connection though, so most gamers stick with a physical cable for anything competitive.
Do I need a high refresh rate monitor for gaming?
It depends on what you play. Fast paced shooters and competitive titles benefit a lot from a higher refresh rate, while slower single player games are far less demanding. If you are trying to decide whether it is worth the upgrade, our guide on whether 120Hz is good for gaming breaks down what you actually gain at each refresh rate.
What if my monitor and PC do not have matching ports?
If your monitor only has HDMI and your PC only has DisplayPort, or the other way around, you can use an adapter that converts one connection type to the other. These adapters are inexpensive and widely available, though for the best picture quality it is still worth matching cable types directly whenever you have the option.
Does the length of my cable matter?
Yes, especially with DisplayPort and USB-C. Longer cables can sometimes struggle to maintain a full signal at high refresh rates, which may cause flickering or dropped frames. Keeping cable runs as short as your setup allows is generally the safer choice, and if you do need a long run, look for a cable specifically rated for the resolution and refresh rate you plan to use.
Why does HDR look worse on my monitor after I turn it on?
Not every monitor handles HDR the same way, and on cheaper panels turning it on can actually wash out colors or reduce contrast rather than improve it. This comes down to how bright the panel can actually get and how it handles different levels of brightness, which our guide on HDR levels explains in more detail. If HDR looks worse rather than better, it is often fine to just leave it off.